CakeCraft Official Documentation
Introduction
Welcome to CakeCraft, a Custom Layered Cake Builder designed to empower bakeries and pastry shops. Built on a robust and modern technology stack consisting of Laravel 12, Livewire 4, and full PWA support, CakeCraft delivers a seamless administrative interface and a high-performance experience for your customers.
Server Requirements
To successfully run CakeCraft, your server must meet the following technical requirements for the Laravel 12 configuration:
- PHP 8.2+
- PDO Extension
- CURL Extension
- JSON Extension
- Mbstring Extension
- OpenSSL Extension
- XML Extension
- ZIP Extension
- Fileinfo Extension
- BCMath Extension
Installation Guide
The CakeCraft setup wizard will seamlessly guide you through the configuration process. Please follow these steps:
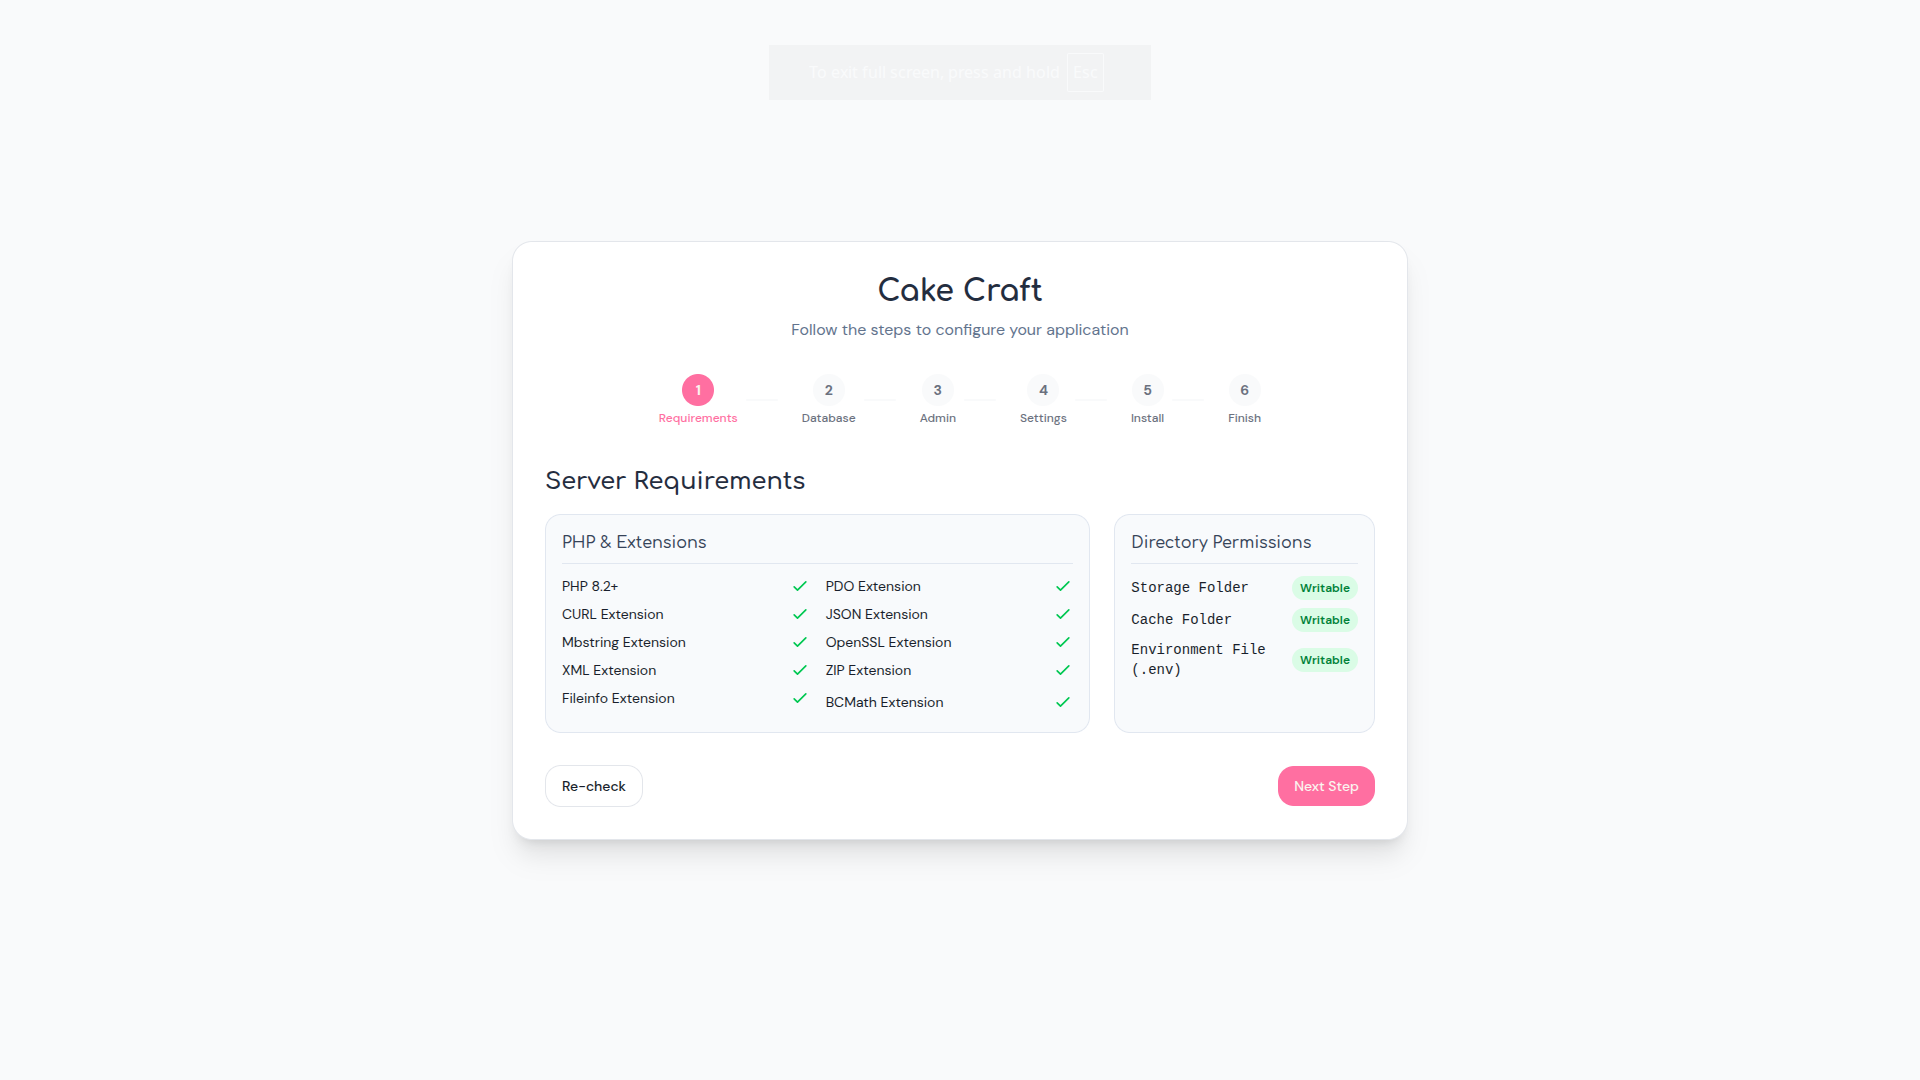
Step 1: Requirements Check
Upon launching the installer, the wizard verifies all Server Requirements and Directory Permissions.
Ensure that the Storage Folder, Cache Folder, and
Environment File (.env) are securely marked as Writable. Click
Re-check if you correct issues, then proceed by clicking Next
Step.
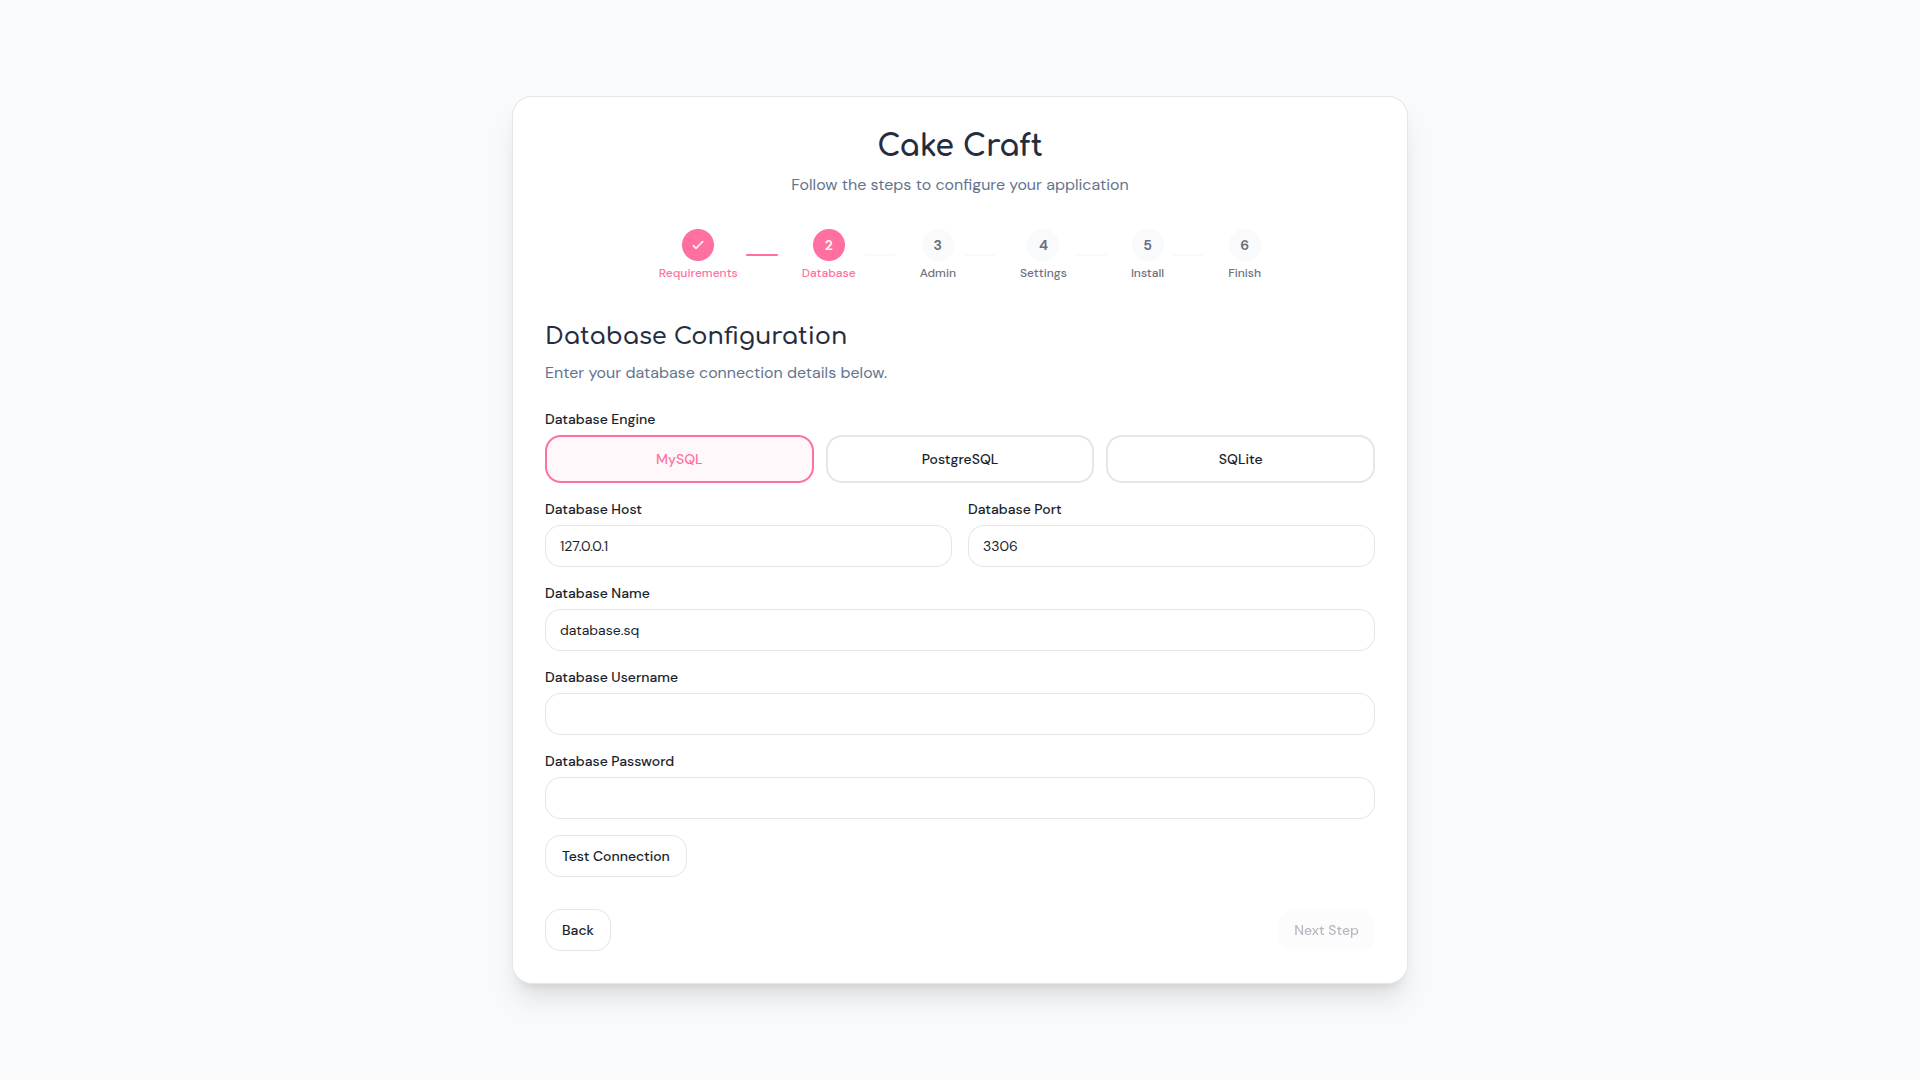
Step 2: Database Configuration
Select your preferred Database Engine (MySQL, PostgreSQL, or SQLite). Input your Database
Host (e.g., 127.0.0.1), Database Port (e.g.,
3306), Database Name, Database Username, and
Database Password. Use the Test Connection button to verify the
credentials, then click Next Step.
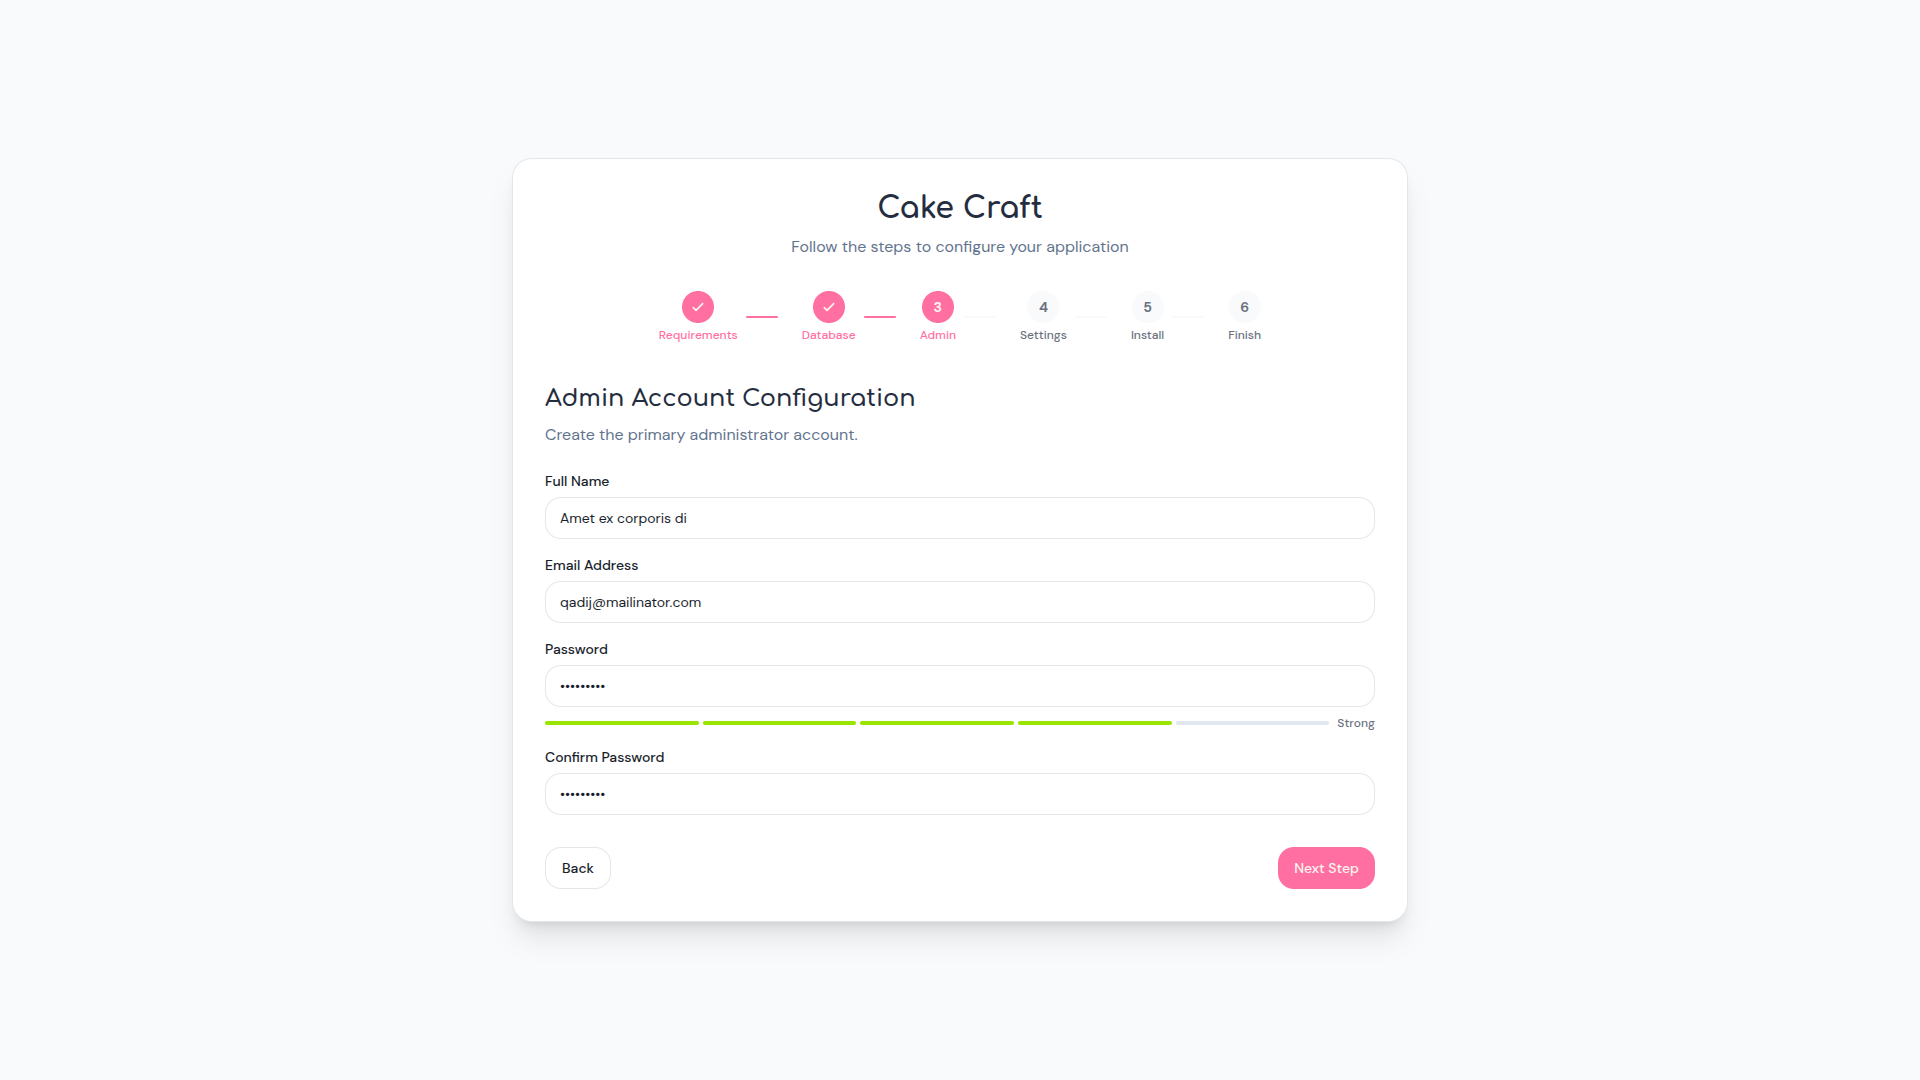
Step 3: Admin Account Configuration
Create the primary administrator account by entering a Full Name, Email Address, Password, and Confirm Password. Observe the security strength meter below the password input. Once validated, click Next Step.
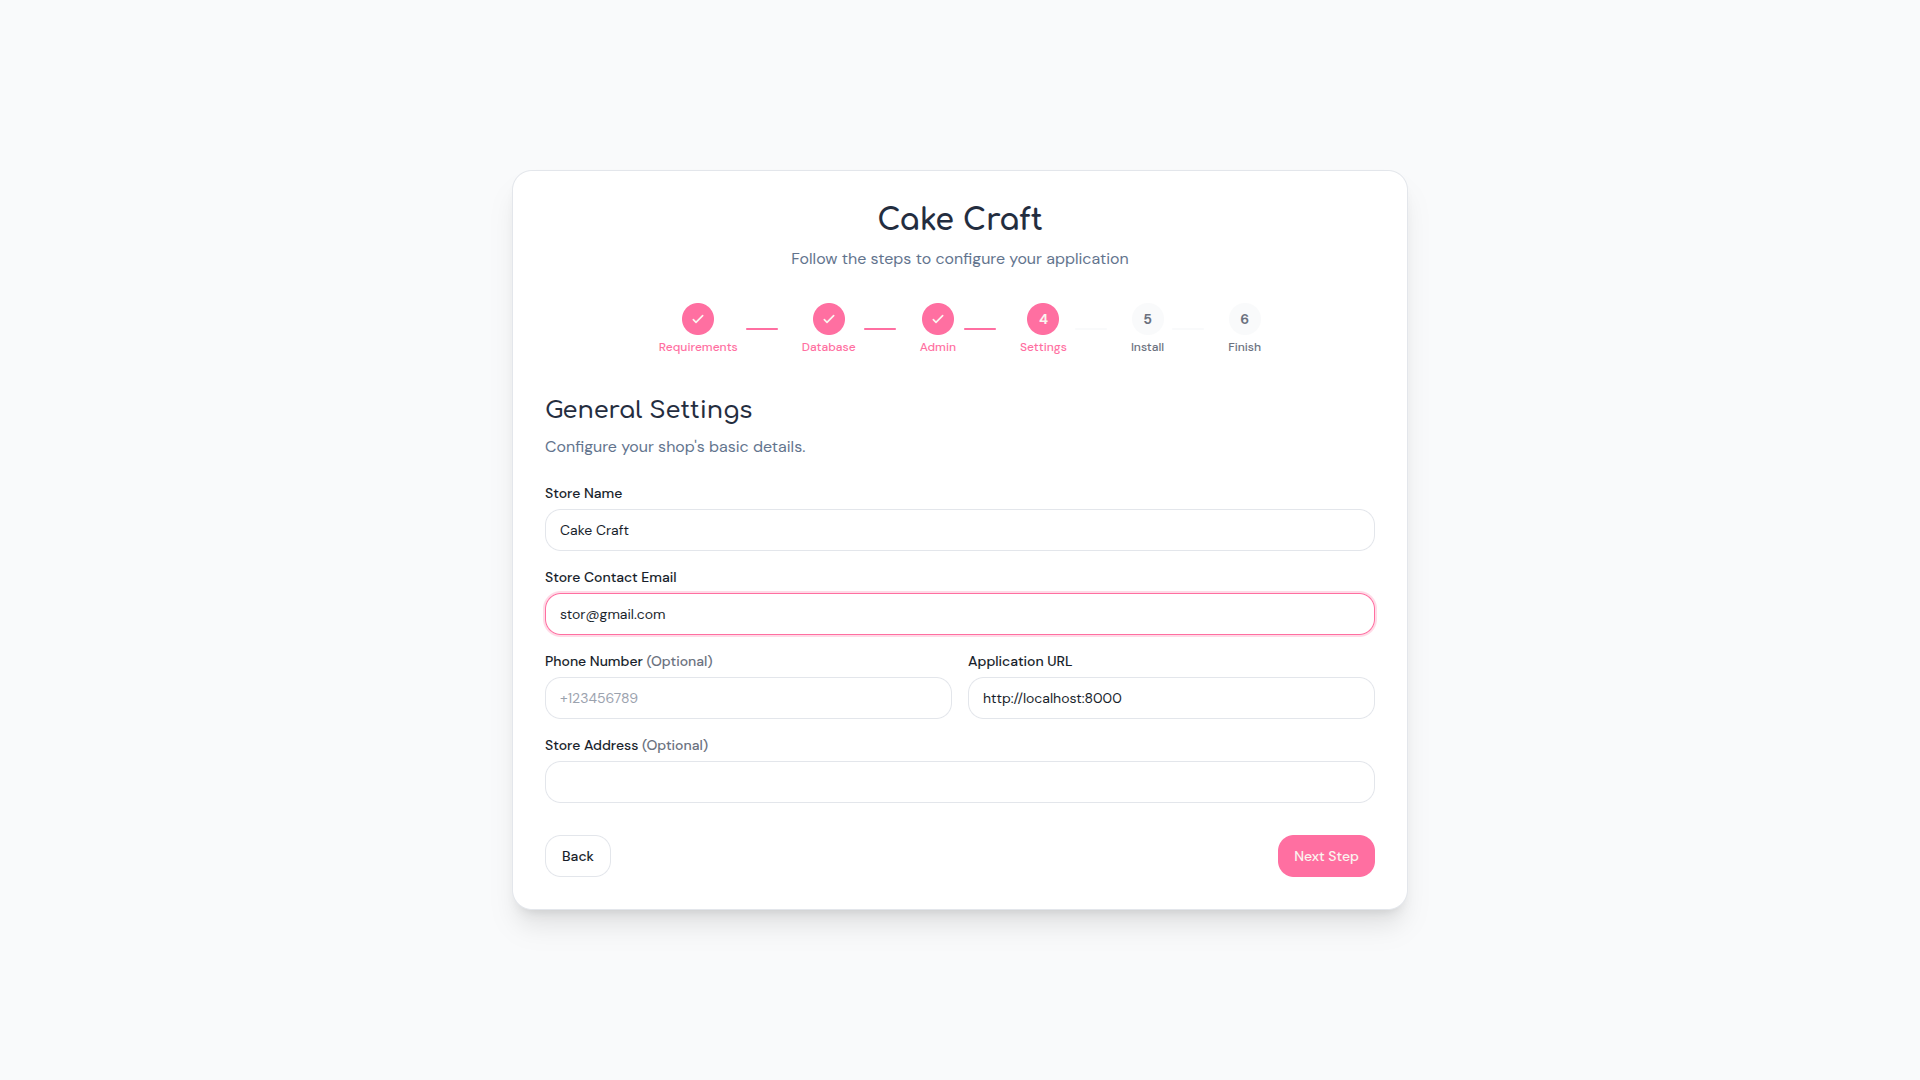
Step 4: General Settings
Adjust the foundational details under General Settings. Specify the Store Name, Store Contact Email, Phone Number (Optional), and Application URL (matching your verified installation path). Submit these entries by clicking Next Step.
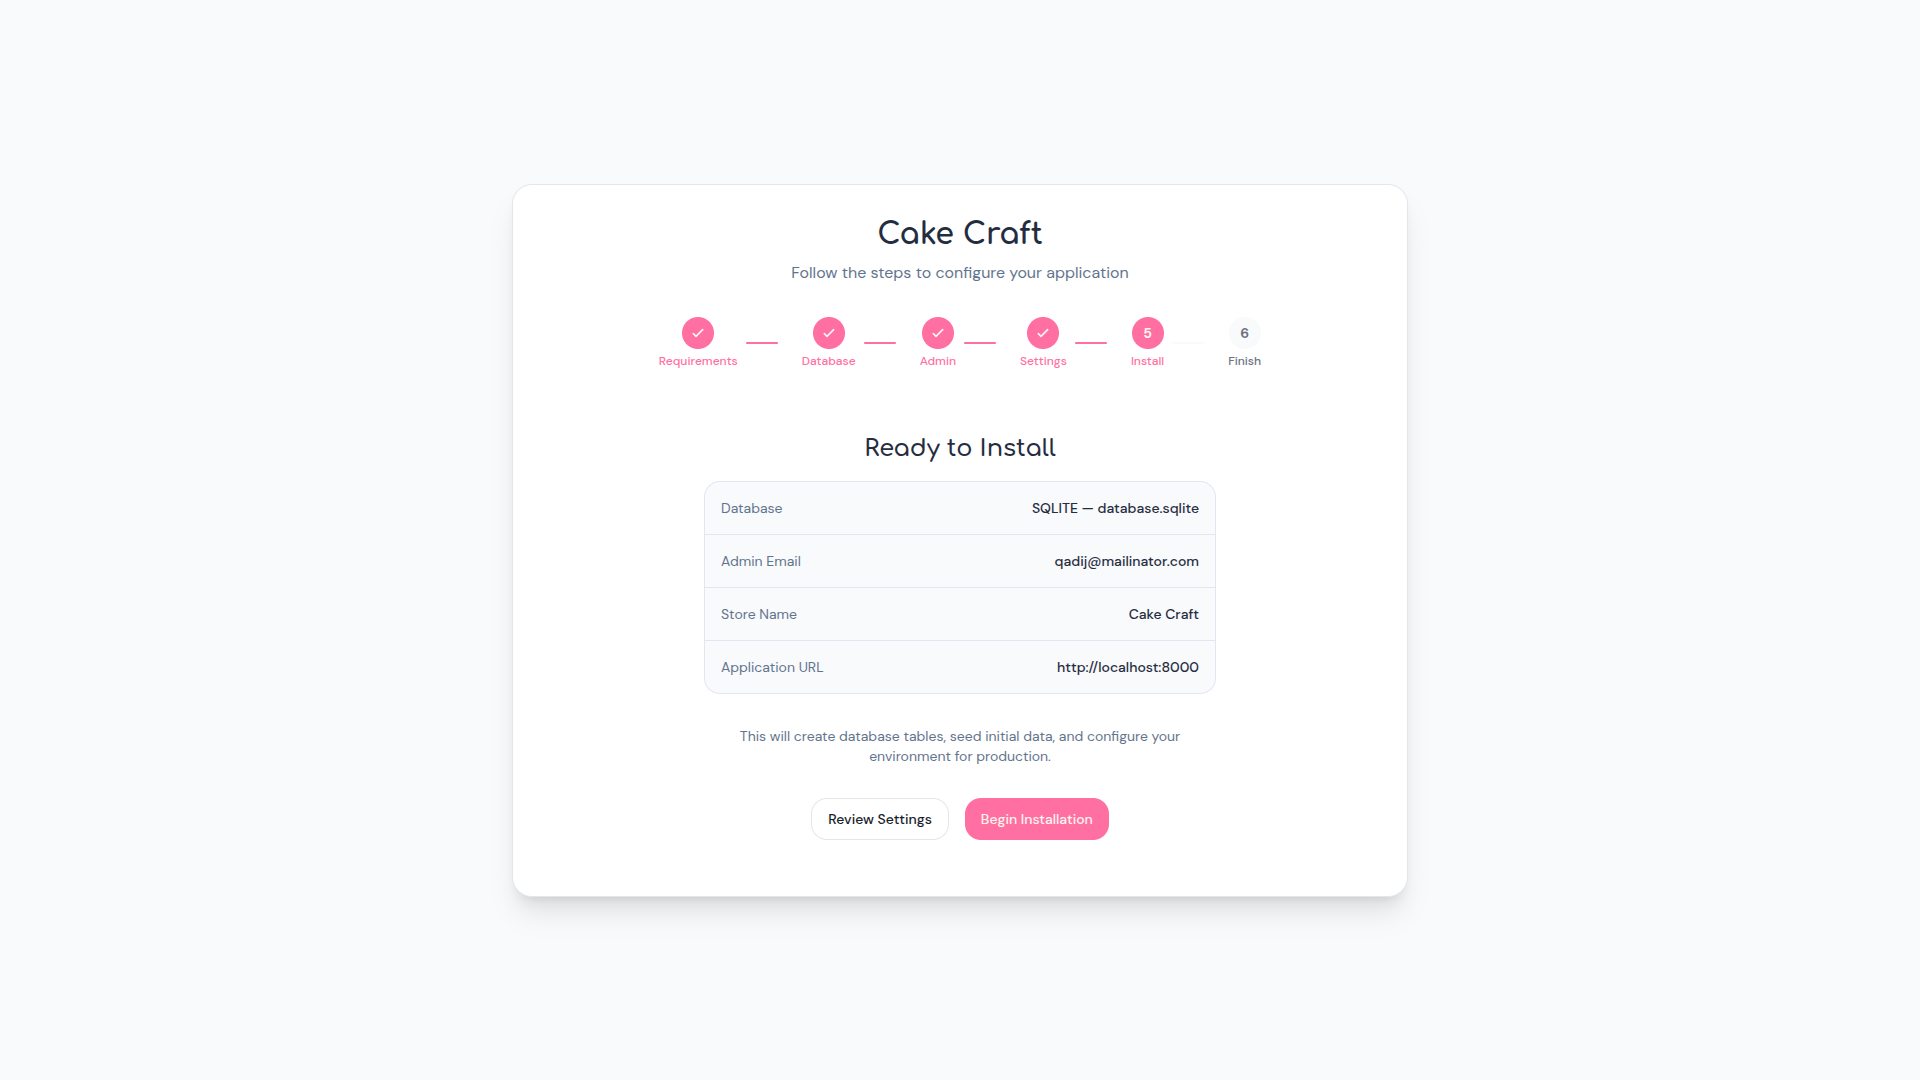
Step 5: Ready to Install
Review the summarized database configuration and administrative details. When ready, click Begin Installation. The system will safely create database tables, seed initial component data, and properly configure your core environment for production.
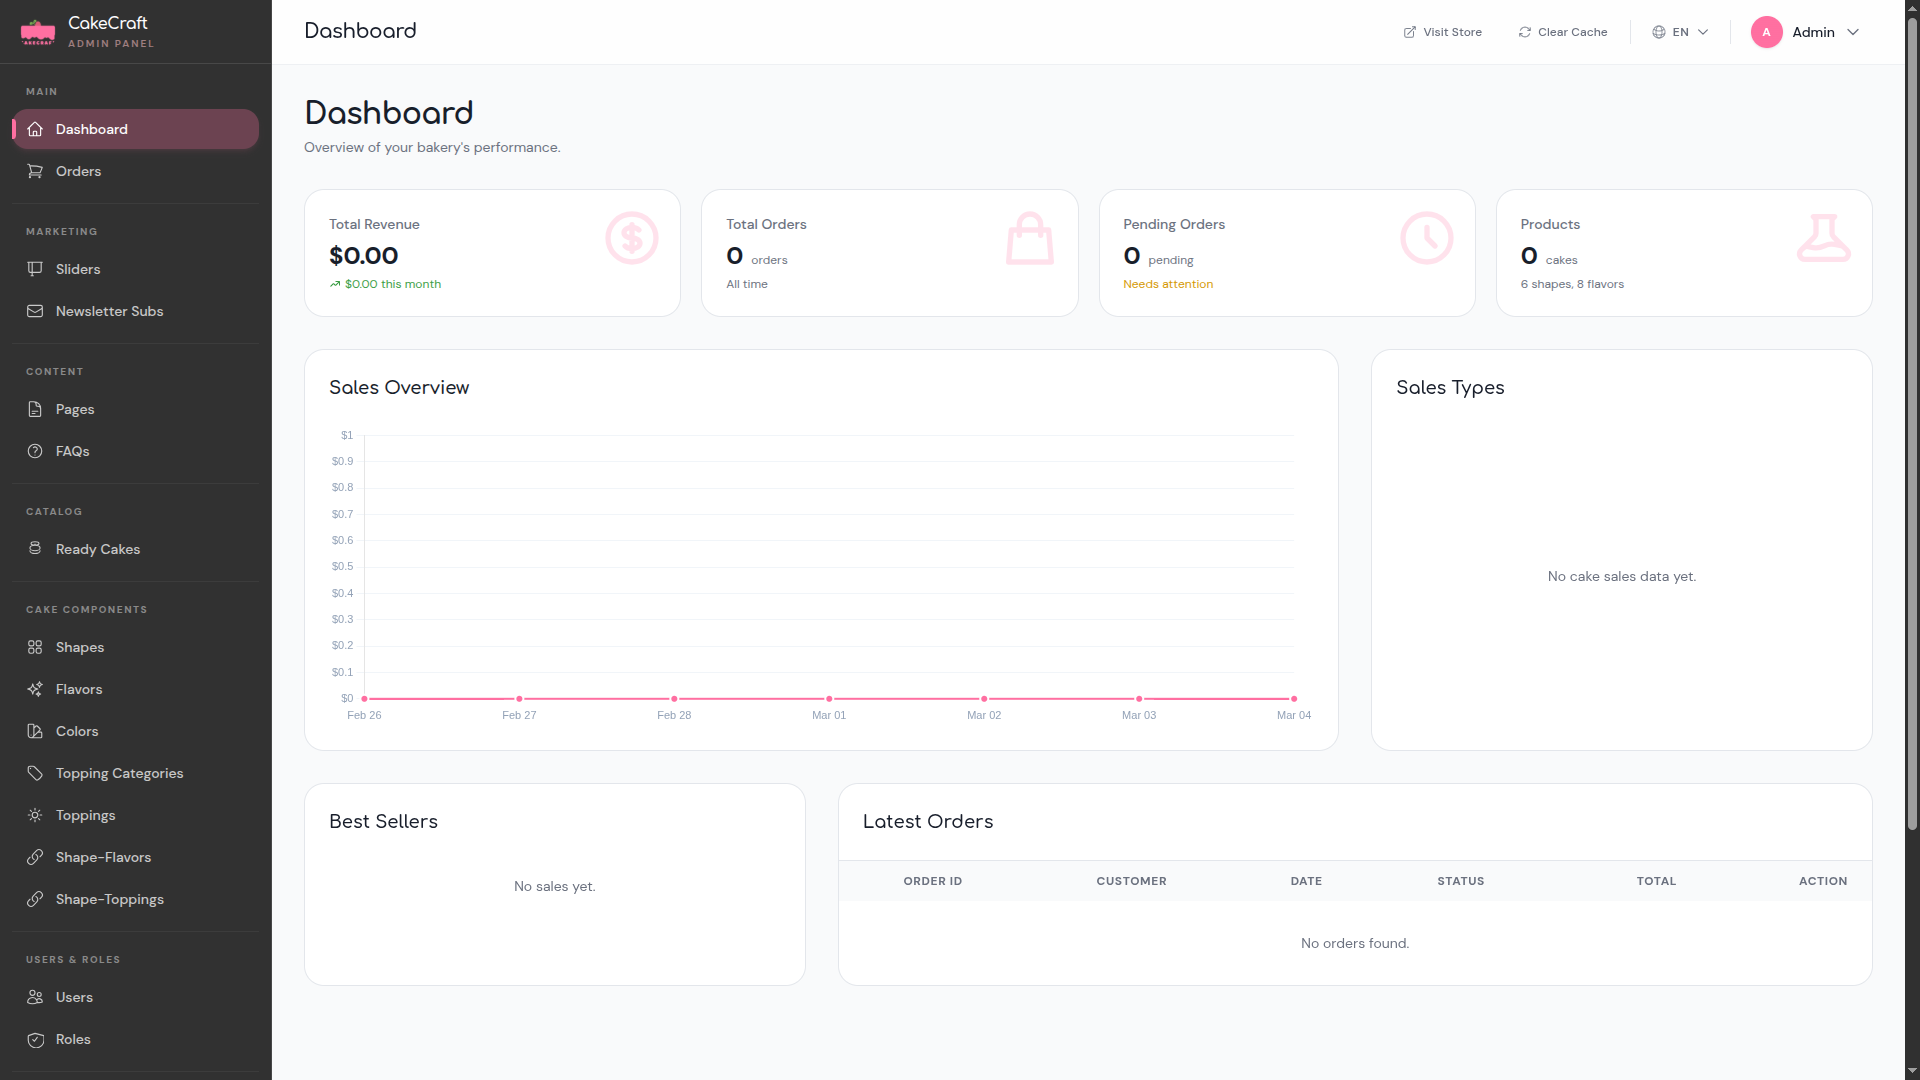
Admin & Moderator Dashboards
The Dashboard provides a real-time overview of your bakery's performance. At the top, four summary cards display key metrics:
- Total Revenue -- cumulative earnings and monthly trend.
- Total Orders -- lifetime order count.
- Pending Orders -- orders requiring attention.
- Products -- total cakes, shapes, and flavors currently in the system.
Below the summary cards, a Sales Overview line chart tracks revenue over time, while the Sales Types panel provides a breakdown of cake sales by category. The bottom row features a Best Sellers widget and a Latest Orders table displaying columns for Order ID, Customer, Date, Status, Total, and Action.
Sidebar Navigation
The admin sidebar is organized into the following groups:
- Main: Dashboard and Orders.
- Marketing: Sliders and Newsletter Subs.
- Content: Pages and FAQs.
- Catalog: Ready Cakes.
- Cake Components: Shapes, Flavors, Colors, Topping Categories, Toppings, Shape-Flavors, and Shape-Toppings.
- Users & Roles: Users and Roles.
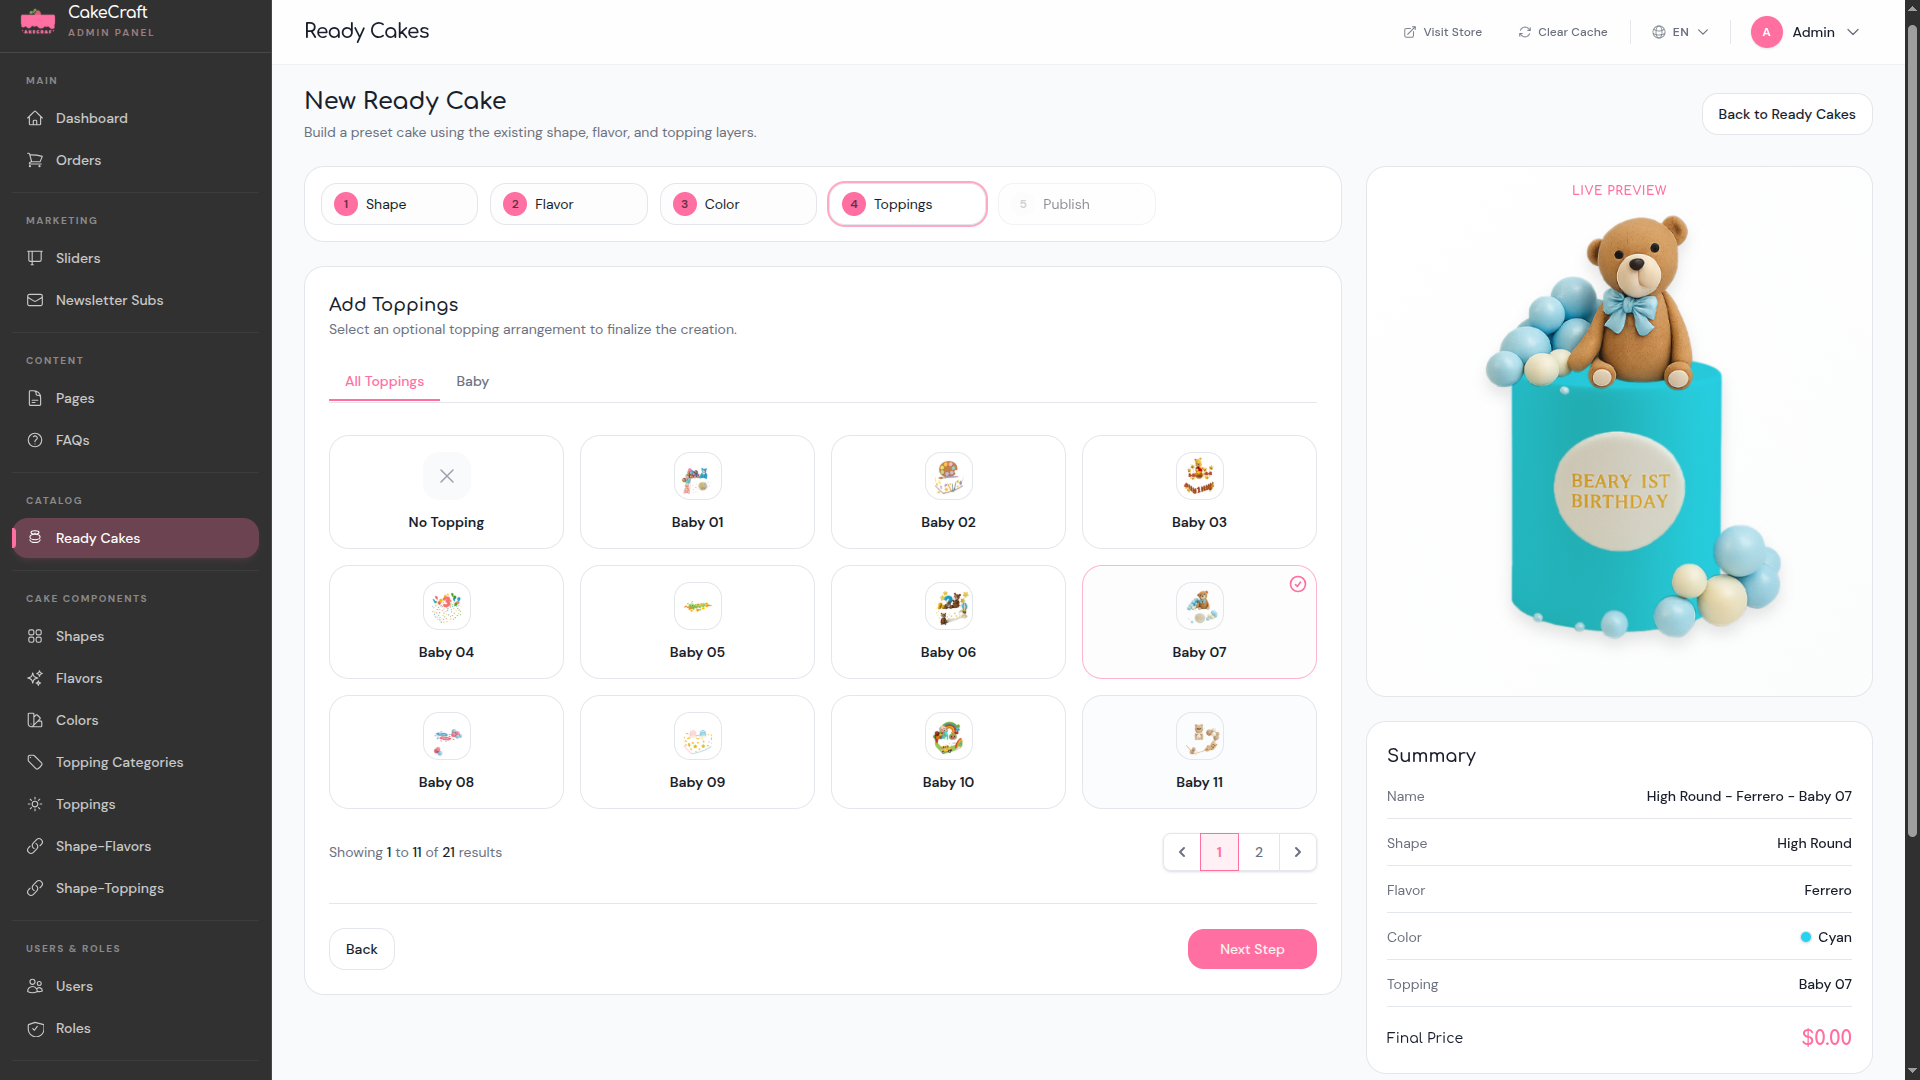
Cake Builder Logic
The Ready Cakes builder allows you to create preset cakes using existing shape, flavor, and topping layers through a guided multi-step wizard. The process follows five sequential steps:
- Step 1 -- Shape: Select a base shape (e.g., High Round).
- Step 2 -- Flavor: Choose a flavor profile (e.g., Ferrero).
- Step 3 -- Color: Pick a frosting color (e.g., Cyan).
- Step 4 -- Toppings: Browse topping options filtered by category tabs (e.g., All Toppings, Baby). Select from a visual grid of available toppings or choose No Topping. Results are paginated for easy navigation.
- Step 5 -- Publish: Finalize and publish the ready cake to the storefront.
On the right side, a Live Preview panel renders the cake in real time as selections are made. Beneath it, a Summary card displays the composed cake details including Name, Shape, Flavor, Color, Topping, and Final Price. Use the Back and Next Step buttons to navigate between steps.
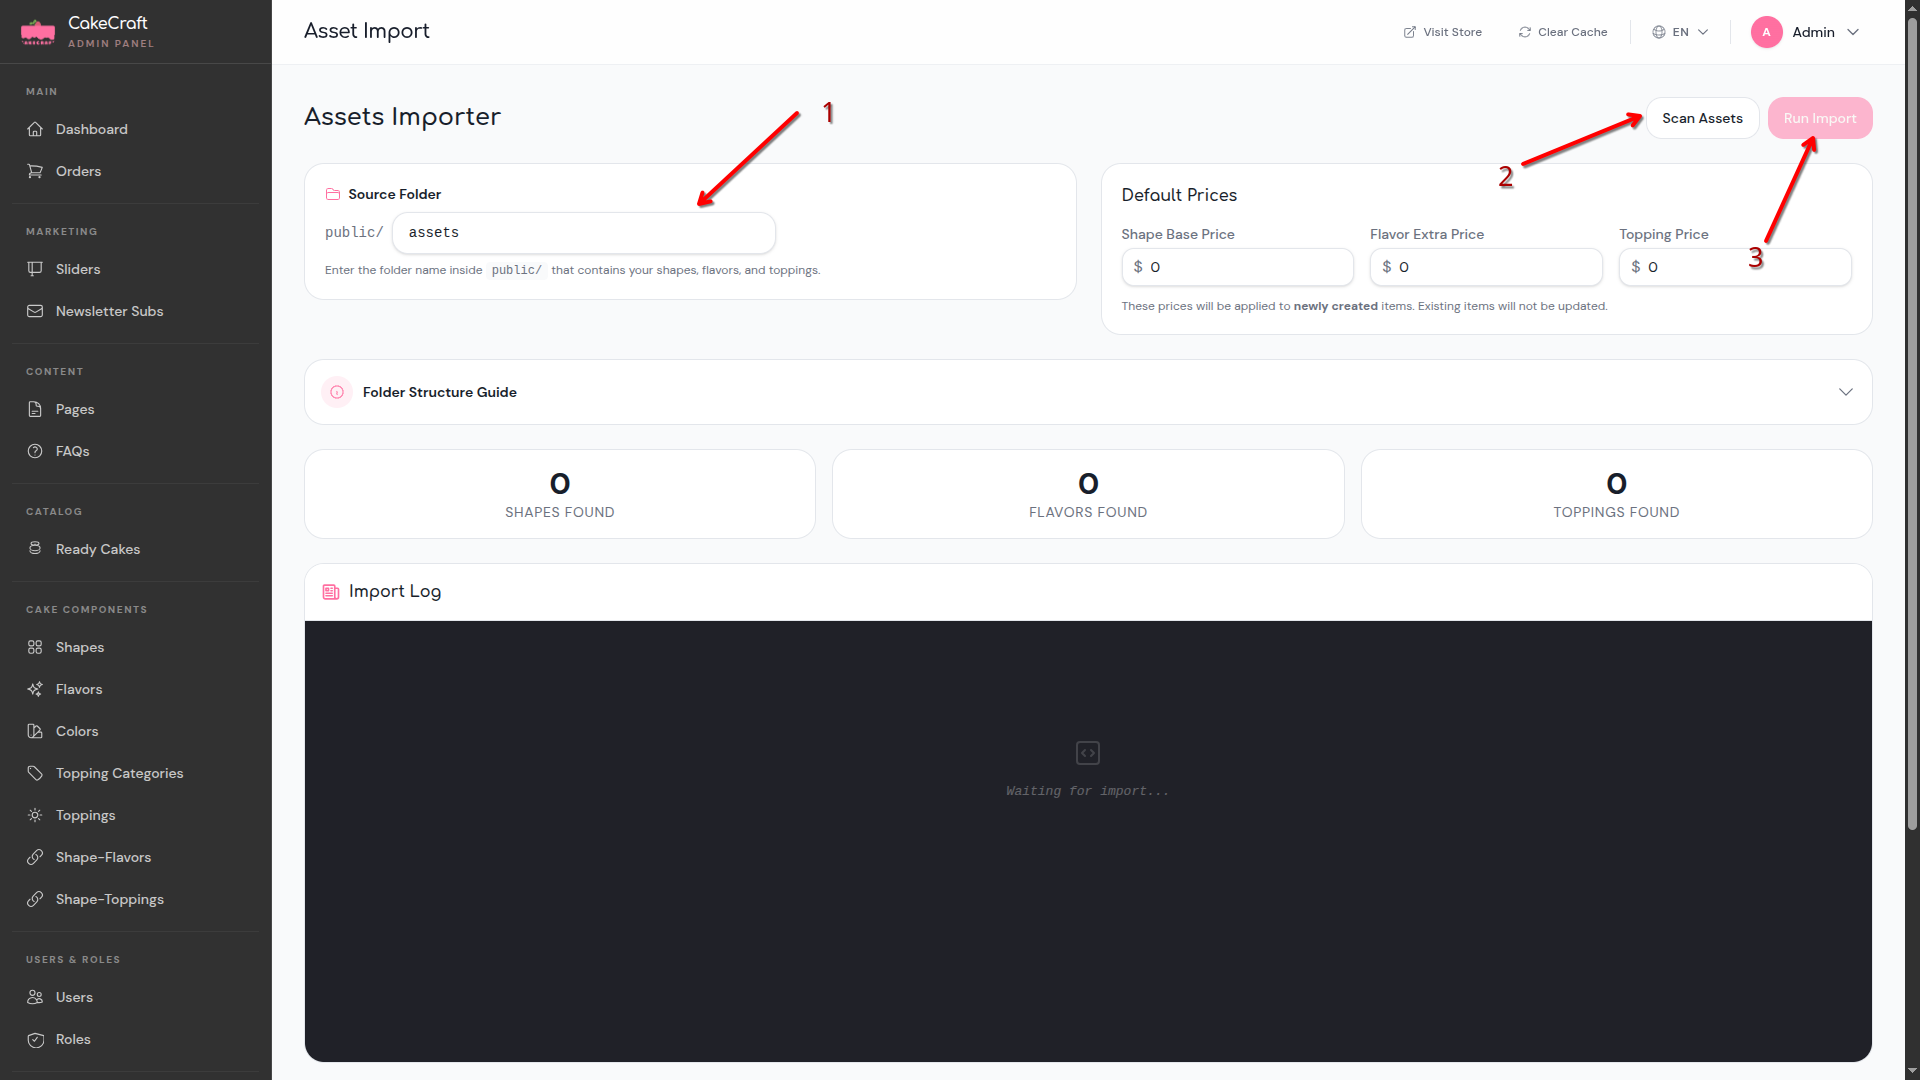
Bulk Asset Import
The Assets Importer module dramatically accelerates initialization by batch processing shapes, flavors, and toppings from a structured directory.
Execution Process
- Go to the Asset Import menu and verify the Source Folder path. This is located
inside the
public/directory and dynamically defaults toassets. - Structure the contents of this target directory rigorously. Segment all assets natively into separated folders corresponding distinctly to shapes, flavors, and toppings so the system properly categorizes them.
- Optional: Specify overarching values via Default Prices dynamically setting the Shape Base Price, Flavor Extra Price, and Topping Price.
- Click Scan Assets to systematically survey your source path. The found totals render interactively in the status cards below for Shapes, Flavors, and Toppings Found.
- Click Run Import to inject the discovered assets into the active catalog system while observing output traces via the real-time Import Log.
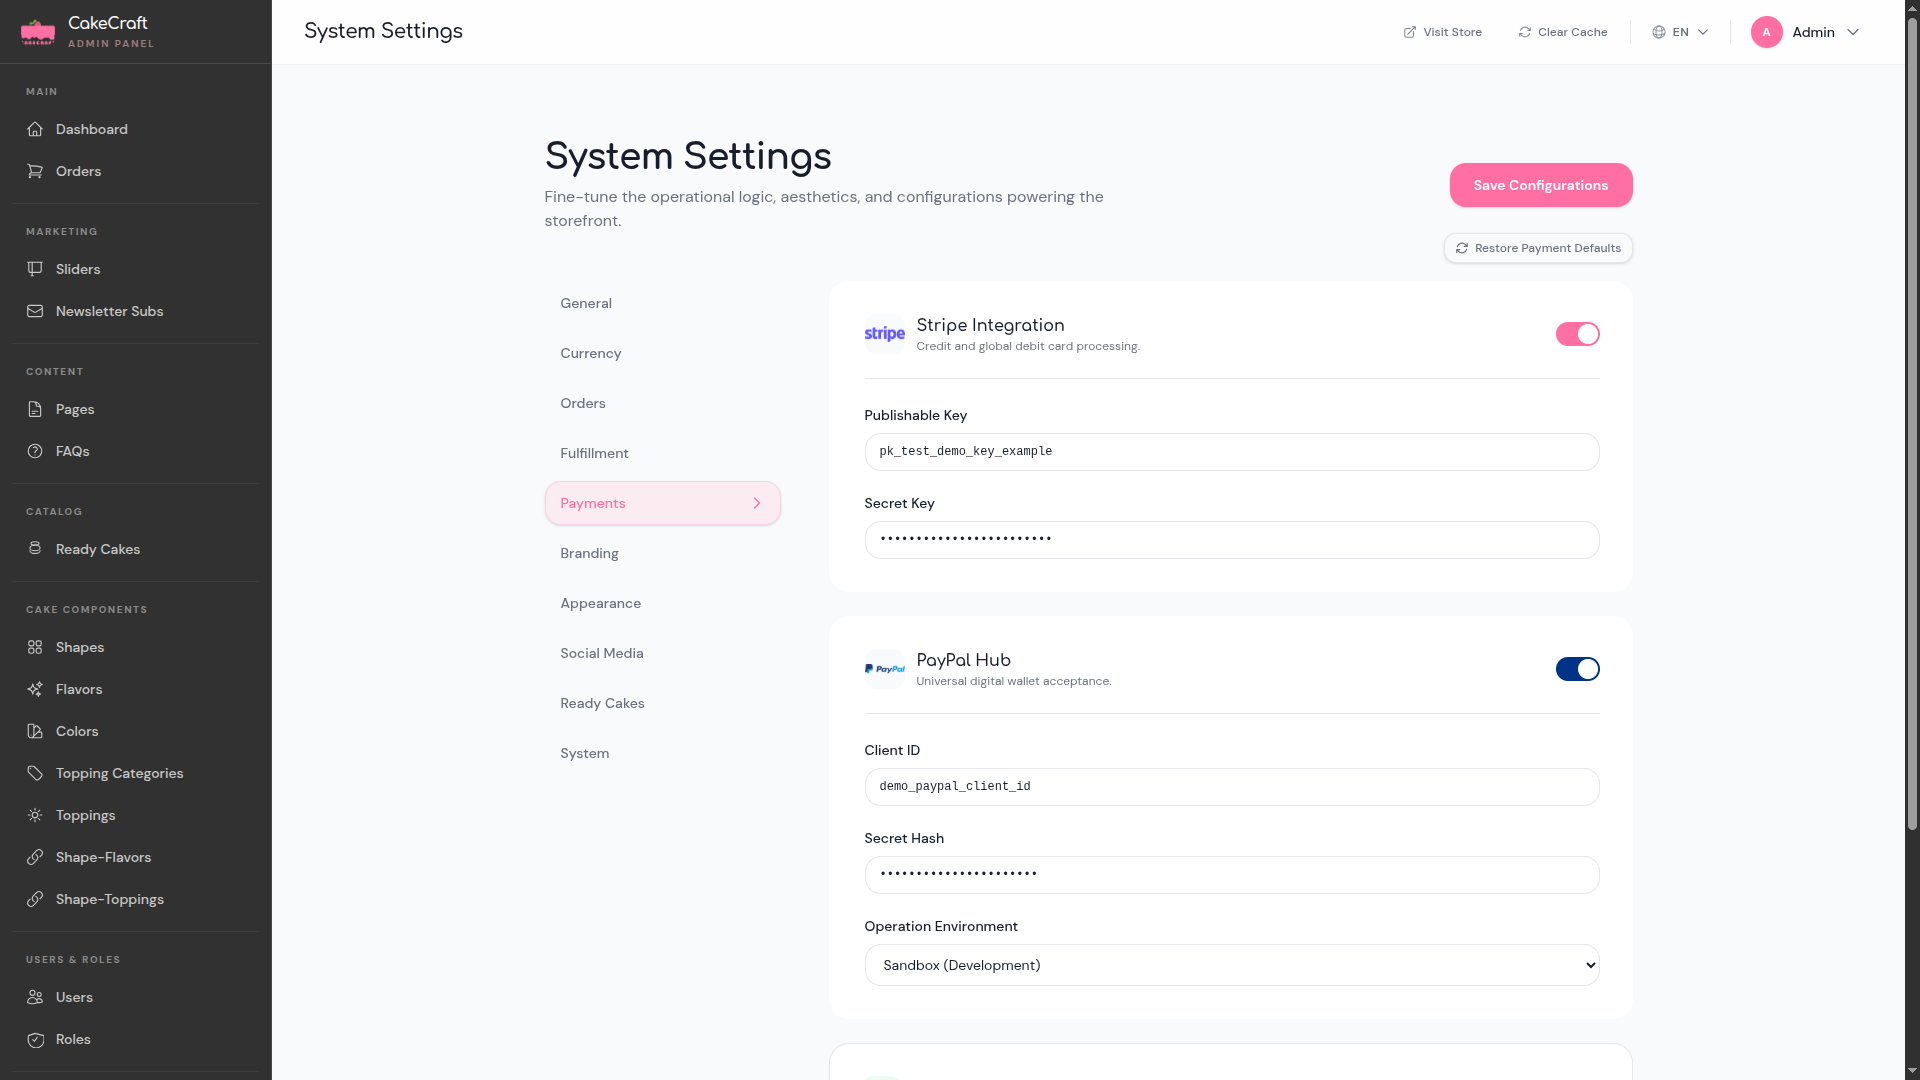
Payment Integration
Payment gateways are configured through the System Settings panel. Navigate to the Payments tab from the settings sidebar (alongside General, Currency, Orders, Fulfillment, Branding, Appearance, Social Media, Ready Cakes, and System).
Stripe Integration
Toggle the Stripe Integration switch to enable credit and global debit card processing. Provide the following credentials:
- Publishable Key -- your Stripe publishable API key.
- Secret Key -- your Stripe secret API key.
PayPal Hub
Toggle the PayPal Hub switch to enable universal digital wallet acceptance. Provide the following credentials:
- Client ID -- your PayPal application client ID.
- Secret Hash -- your PayPal secret hash.
- Operation Environment -- select Sandbox (Development) for testing or Production for live transactions.
Click Save Configurations to apply your changes. Use Restore Payment Defaults to reset all payment fields to their original values.